How To Add an Object to Rocket Club
Home Page
Download It!
How To Play It
Donate $
Community:
Bulletin Board
Developers:
| So, you want to
make your mark on the Rocket Club universe by creating a
brand new object for it. I mean, you want to make
a brand new KIND of object. Something that other
people can then build many copies of, sell to
each other, and blow up. What could be a loftier ideal than that? This page is intended to focus on the exact steps you must take to make this happen. For additional details, please check out the Rocket Club HowTo page. If you are just going to re-texture an existing model, you can probably skip a few steps, but please read this whole document anyway. |
| WHAT IS
COVERED HERE ----------------------------------- What You Have To Do: |
| DECIDE WHAT TO MAKE ----------------------------------- Not surprisingly, this is often the hard part. Plus it is a bit of a moving target as new classes of objects are added. Currently, you can add (or will be able to add in some future release) the following sorts of objects:
Then, after you decide what you want to make, think about what you have seen in the game before which is Most Like That Thing (tm). Each object that people can make is defined by a NANO PLAN file. You will want to clone an existing plan file and then modify it until it describes your new object. For this tutorial, let's say we are going to make a new building piece, and our existing nano plan to emulate is the 'platform' piece (which is basically just a hunk of matter of an arbitrary shape you can drop somewhere. It has no real behaviour, like, say, and animal does.) We basically need to come up with:
So, let's get cracking! |
| MAKE A MASTER ART
FOLDER ----------------------------------- You are an artist. You are a designer. You are a creative genius on a mission to improve the universe! You cannot be bothered with the real time limitations of the game! You make BIG things, HIGH RESOLUTION things! Things that need to be BACKED UP so you don't lose all your work. So, don't depend on Rocket Club to keep your precious creations safe! Make a Master Art Folder (anywhere you like, so long as it is not inside the Rocket Club folders) and organize it in whatever means you like. But for Rocket Club, you will be creating three sorts of things, so you might organize it with two or three folders:
Remember: You do your ARTISTRY in your MASTER ART FOLDER. Later you IMPORT your ART into Rocket Club (at which time it gets compressed and renamed). If you want to modify something you already did for Rocket Club, you return to your MASTER ART folder to do the change, then IMPORT the new version into Rocket Club. IMPORTANT NOTE ABOUT FILENAMES Rocket Club is not the open chaos of, say, Well of Souls. Your asset file names must be short and sweet (think 16 characters), and use ONLY english letters and numbers, no spaces, no punctuation, no 'leet symbols. MilkShape and your paint program probably will let you use other characters, but you'll be sorry if you do! If it's a chair, call it "chair.bmp" or maybe "chair3.bmp" if you have made other chairs, or "recliningChair.bmp" or "chairWithHandle.bmp" or "twoPersonChair.bmp" Don't bother calling it "MadHackersSuperLeetChairForMyGuildOnlyContactMeForCustomDesignWork.bmp" Your 'name' will automatically be added to the file at the time you import it into the game, so everyone will know who made it. Your own file names only need to be unique relative to the things that you personally have added to the game. So you and I can both add "chair.bmp" and they won't conflict. |
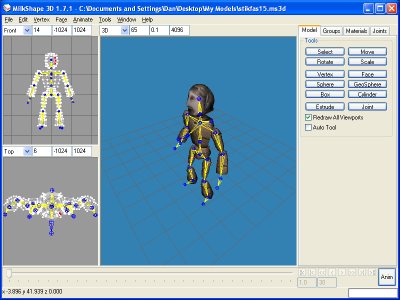
| MAKE A MODEL FOR
YOUR OBJECT ----------------------------------- Most new objects deserve a new model. The model specifies both the shapes, and the names of the textures to be painted on those shapes. For Rocket Club, we recommend the MilkShape 3D modelling program: Mainly because it is MUCH cheaper than 3D Studio Max and does what we need to get done. In theory you could use something else, if it was able to export models in the MilkShape ASCII file format. But there's nothing better than MilkShape. Fiddle with your model until it is as you like it, then:
Consider backing up your files as well. And save frequently while working, changing the name as needed so that you can get back to favorite past versions should something go horribly wrong. And use as few polygons as you can, put the details in the textures. We want the Rocket Club Universe to be able to hold billions of objects, so don't waste computer power. Other than that, make things as pretty as you like :-) Character files require keyframe animations, which I am not yet ready to document, though you might rummage around in the stock character files if you are curious. |
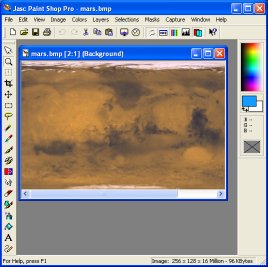
| MAKE TEXTURES FOR
YOUR OBJECT ----------------------------------- In case you didn't already know this, your model file is just 'geometry' and left to itself your model would appear in the world as just a bunch of shaded (gray) triangles. What makes a model look really cool is to have a colorful image pasted onto it. In fact, a good image implies all sorts of extra geometry which isn't even there. Your space ship might have a fairly flat and bland model, but with the right texture on it, it looks like it is covered with little pipes and dings. When you are designing the model, you call out these pictures as 'materials' and give them names like "wood" and "metal" and specify which triangles should be displayed with which material. Later, in the nano plan file, you will call out a specific texture image to be used for each material. I like to use PaintShop Pro, since it has all the functionality I need, at a much lower price than PhotoShop. (Call me old fashioned, but my reaction to overpriced software like PhotoShop or 3D Studio Max is to use something cheaper, not to steal warez.) But you can use any paint program you like. Be sure to do all your work in a full 24bit BMP formal (no compression). If you need to edit it later, you want to have all your bits available to you. Save your texture files in your MASTER ART folder. Later we will import copies of them into the game. Now, your Texture Files are generally pretty intimately connected to their models, in the sense that, for example, a character 'face' file has to have the eyes in just the right spot on the texture sheet. It is an art to do this right, so that's why YOU the ARTIST have been employed! But random crap actually looks pretty cool, too :-) Oh, Texture files are always a 'power of two' in dimensions. Like 64x64, 128x128, or 256x256. Use the smallest size you can get away with. Textures eat up memory like nothing else. You can mix the size up to get rectangles like 64x128 or 256x128 if that works better for your needs. Powers of two you should consider are:
I reserve the right to 'downsample' your texture if you disobey my orders! |
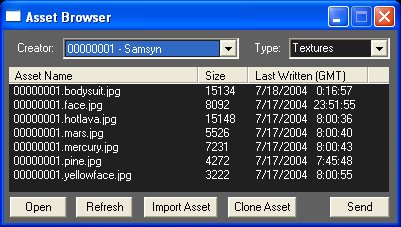
| IMPORT THE MODEL ----------------------------------- So, you have a model safely tucked away in your master art folder. And you used Milkshape to export it as a .txt "Milkshape ASCII" file. (also in your master art folder somewhere.) But to use the model in the game, it has to be added as an 'asset' and copied to the game's asset folder. You *could* do this manually, but you *could* screw it up, so I added something to make it easy to do automatically. First you run Rocket Club and open the ASSET BROWSER (using the CONTROLS menu) Then you use the drop-down combo box in the upper right to select MODELS (the image above is for TEXTURES, sorry, but models looks similar). This then shows you a list of all the models you have in your own personal asset folder. As a DESIGNER, you have your own personal folder in the game's asset folder. That makes you cool. To Import Your New Model:
The second time you do this, you will suddenly realize that I am a really nice guy and I make it remember where you last imported from, so you only have to find your master art folder once per import type (I mean, I remember the last MODEL import separately from the last TEXTURE import. I am just that cool! All for YOU! Coz you are my BEST FRIEND!) WHAT HAPPENS WHEN I IMPORT A MODEL? Well, mainly it just gets copied from your master art folder to your personal asset folder, plus it gets renamed a little. When the dust settles, your "chair.txt" ends up in this file:
Note how your 'author id' (OK, it's your player serial number!) Gets added to the file name AND you get your own sub-folder of the assets directory. This is why your asset can have the same starting name as someone else's. The game will directly use this file. The game will never use your Master Art folder. It is THIS file which will be automatically copied to the other players as they need it. If you later edit your 'chair.txt' file in your master art folder, you will need to import it again into the assets folder (overwriting the existing asset). |
| IMPORT THE TEXTURES ----------------------------------- Um, this is the same thing as importing a model, only now it's for textures. Again you start by running Rocket Club and opening the ASSET BROWSER: Then you:
Yeah, I just realized I should point out that you have to import things one file at a time. WHAT HAPPENS WHEN I IMPORT A TEXTURE? This is a bit more complicated than importing a model, since the texture is actually modified in the process (the COPY is modified, your master art version is left untouched). Ultimately it is converted to a suitable compressed format (currently that's .jpg) and saved in your personal assets folder. So your texture "myMasterArt\metal.bmp" ends up as file:
And THIS is the file which gets shared automatically with the other players. |
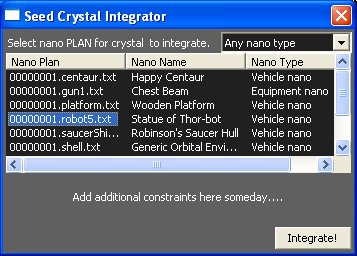
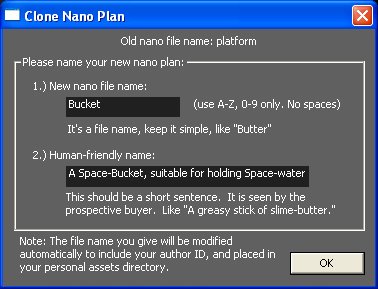
| CLONE A PLAN FILE ----------------------------------- OK, you made your model, made some matching texture images, and imported them into your personal asset folder in the game. How do you make a new actual object appear. Specifically, how do you make it show up in that 'Crystal Integrator' dialog? Well, you have to make a NANO PLAN file, of course! This file defines the object, giving it a friendly name "Stick of space-butter" and tells it what model to use, what texture files to use for each of the model's materials, etc. HOW DO I MAKE A NANO PLAN FILE? Well, you clone an existing one, of course, then customize it. To do that you open the ASSET BROWSER again and this time select a list of PLAN assets. Pretend the image above is showing plan assets. Rummage through the list until you find something which is very similar to what you want to add. For example, if you're adding a vehicle, pick some pre-existing similar vehicle. You COULD pick anything on the list, but you'll save yourself some work by picking something similar Then press the CLONE ASSET button (this only works for PLAN assets, by the way). This opens a window which asks you to name the new plan. You must provide TWO pieces of information. The first is the 'filename' for the plan. This must be a simple thing like "chair" or "raygun" Again, you are not allowed to use anything but alphanumeric characters in the file name. The other information you provide is the friendly name of the new object. This is what the end-user will see. It should be fairly brief, but descriptive (you can change it later, no biggie, and there is another field later where you can stick in a longer 'description' of the object) When you're ready, press OK, and the plan file will be cloned (copied) and renamed, and placed in your personal asset folder. So, if you gave your new plan the name 'bucket' then it will end up in:
Which is probably exactly what you expected to see :-) After cloning the plan file, the game then automatically opens the Plan Property Editor so you can customize it. Until you do this, you have just made an identical copy of the original object, only given it a new name. The world probably doesn't NEED one of those, though I imagine people will do it anyway. STUPID people. BAD people. You don't want to be like THAT, do you? |
| CONFIGURE THE
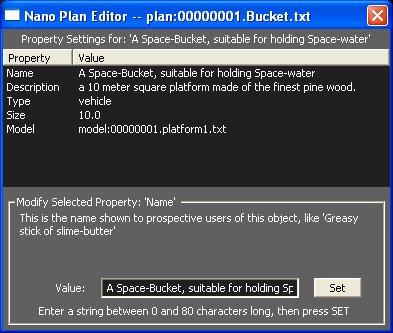
PLAN PROPERTIES ----------------------------------- When adding a new object to the world, after cloning up a new PLAN file for it, you will want to customize it so that it uses your new model and/or textures. You do this via the PLAN PROPERTY EDITOR. You can open this via the ASSET BROWSER (show list of plans, pick one, press OPEN button), or it opens automatically when you clone an existing plan file. The property editor is pretty simple. It shows a list of properties and their current settings. Just click on the property you want to change, and then enter the new information in the lower half of the window. I include some helpful comments for each property so you sort of know what they are for. As of this writing, the property editor does not yet support ALL the properties you will want to be editing. But I promise it will someday. There is not an UNDO option here, so be careful. When you make a change, you are making a change. Right away. You can go back later and modify your plan files (you should only modify your OWN plan files, by the way, and the game will try to prevent you from messing with plan files defined by other people.) In the above example, you can see that the Name and Description don't match, since I just cloned this bucket from the platform nano plan. So I will want to change the Description property to make more sense. You will definitely want to set all the following properties on your new nanoplan:
The SIZE parameter is sort of 'smart' in the sense that if you say something is 5 meters in size, that specifies the size of the largest dimension (height, width, depth). So a tall skinny thing would be five meters high, but a short flat thing would be five meters wide. Otherwise preserving the proportions called out in the model file. In addition to making it easier to use the same model for different sized objects, I did this so we wouldn't have to enforce some special scaling units in MilkShape. I figured that would be impossible. SO use whatever units are convenient for your drawing needs, and then I will scale the model at run time to match this value. |
| SHARE IT WITH THE
UNIVERSE ----------------------------------- OK, Cool, you have added a new object to your little corner of the universe. Now what? How can other people start to use it? Well, basically, you just use it yourself. Anyone who runs into one suddenly learns all about it. So make a chair and drop it in your star system. People visit you, they see your chair (maybe you sell them a couple), it propagates. Or you visit THEIR star system, and drop your chair. Currently, your PLAN file will not show up in their INTEGRATION dialog. That will change, but probably be related somehow to the skills system. Or maybe I will come up with a way to 'securely' sell PLAN files. Game-wise, I don't really want to sell them in that sense, since I want people to have access to new stuff easily. But on the other hand, it's traditional to have to skill up before you can access the cooler designs. I might make it a plan property (min skill level required, or facility with the elements used, or something.) |
| WHAT IF
I WANT TO USE SOMEONE ELSE'S MODELS AND TEXTURES? ----------------------------------- From one perspective, this is about YOU adding new things to the world. BUt you will inevitably want to re-use some portion of another person's work. This is OK, since anyone who adds something to Rocket Club is giving free license for anyone else to re-use it IN THE CONTEXT OF ROCKET CLUB. But the thing to remember is that YOUR assets go in YOUR asset's folder, and the OTHER GUY'S ASSETS go in HIS asset folder. Don't be editing assets in someone else's folder! The chaos you cause will be short term (his copy will have priority over yours, overwriting your changes), but you will lose your work. If you want to MOSTLY use someone else's asset, but change it a little, then make a copy first (clone it) and edit the copy (which will then be YOUR asset). I'm not sure completely how we will credit this, so use your own best judgement, and try to use the other guy's asset without modification whenever possible. Having said that, how do you even see his assets? The ASSET BROWSER only shows two asset folders: yours and mine (I am 00000001). Well, this is not true. The ASSET BROWSER is actually designed to be a COLLABORATIVE TOOL. And the directory drop-down shows the IDs of EVERYONE TO WHOM YOU HAVE AN IM WINDOW OPEN. So open an IM to somebody, chat with them, and examine their assets. You can resize the ASSET browser by making it wider, which exposes a preview window, which makes it nice to browse textures. |
| TITLE ----------------------------------- Body |