Rocket Club Developer Pages
Particle Systems
Home Page
Community:
Bulletin Board
Developer Pages:
Overview
Texture Assets
Animation
Developers:
Development_Notes
| So,
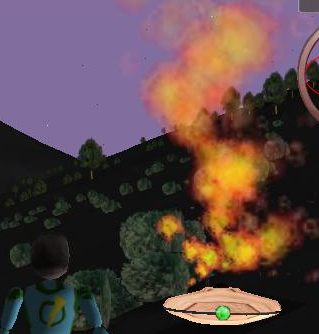
What's a Particle System? Rocket Club has its own idea as to what a particle system is, so my apologies to any particle system purists in the audience. First, a picture:
This picture has a single particle system in it, one which is bound to an object (the fire is rising up out of the wooden disk below it). While not obvious from this still image, there is a constant stream of random fire boiling up and out. It's real pretty. In this particular image there are 40 'particles' at any given time. Each particle is born at the bottom, and rise upwards and enlargens and fades. In Rocket Club, a particle system is defined by a special INI file in your "Particle" asset folder. For example:
Where 00000001 is *my* developer serNum and you would add yours to your own folder. Feel free to rummage through my particle systems for ideas and possibly additional documentation. But remember, the INI file defines a 'type of' particle system (fire, smoke, snow, etc) but it is your dna plan file which calls out which type of particle system (if any) which is to be used with that object. |
| Particles,
Emitters, and Stages A particle system is invisible until it has emitted some particles. Generally particles are emitted at some rate (which might vary over time) with some initial velocity and appearance. Particles then move according to some form of physics and evolve through different stages (the fire puff becomes smoke, the rain drop becomes a splash..) A particle system has one or more emitters which define how new particles are generated. When you hold a fourth of july sparkler, the hot end of the wire is the emitter, and the sparks are the particles. Gravity and thermodynamics provide the physics, and the particles go through the stages of 'glowing on wire', 'leaping as sparks', 'being pulled to the ground', 'becoming glowing embers', and 'fading out' A campfire particle system might have one emitter for the flame, and another emitter for background smoke, and perhaps a third for the occasional popping ember. Individual particles may stay as fire and fade, or evolve into smoke. The physics might change with each stage, with fire rising quickly, embers affected by gravity, and smoke billowing outwards. Individual particles eventually die and then are reborn as newly emitted particles, allowing the system overall to use a well-defined maximum number of particles. As a responsible particle system designer, you need to focus on keeping the particle count small and the physics computations simple. |
| The
Particle System Texture Image, and Cells Particle Systems are truly 3D in the sense that each particle has a real 3D position in the world. However, the image drawn at that point is actually a 2D 'billboard' (a 'square' image whose center is at the 3D point, but which is always/usually drawn 'facing' the camera) The illusion of a solid 3D mass of plasma comes from the individual images not having hard outlines and thus their points of overlaps are not apparent. This also requires the use of 'alpha transparency' so that you can control how much one particle can be 'seen through' another. Over the lifetime of a particle, it's opacity will probably change. Most particles 'fade out' by having their opacity go completely transparent over time. Once the particle is completely transparent, it can be recycled without the viewer noticing it popping out of existence. One axiom of a Rocket Club particle system is that each system has a SINGLE texture image associated with it. And generally that is a PNG file (since the PNG format is nicely compressed AND supports an 'alpha channel') But before you freak out (how can I have smoke AND fire in the same particle system if there is only one image?), the texture image can be broken into 'cells' (the image file is actually a 2D array of images, with some number of rows and columns) For example, here is a portion of the image file used for the example above:
This is four 'cells' (the actual image has more cells) and you can see the 'alpha' implied by the checkerboard background 'showing through' where the transparency is high. You won't see the checkerboard at runtime (this checkerboard is from Gimp) Your emitter and stage configuration can descript which cell image to be used for an individual particle. This might be random, or you might vary it with stage or emitter, or you might even play the cells in order as a little cartoon over the life of the particle. The actual Texture Images are in your Texture assets folder, like:
Again, substitute your own serNum for the 00000001. In theory, you could use the same textures on your models, in theory. but you probably wouldn't want to. If your particle image file does NOT have alpha in it, then you will see a bunch of square images with some background color, instead of nice soft particles. |
| Physics I will probably add to this over time, but the physics of motion/change for individual particles include:
|
| Configuration
Options in your Particle INI File A PARTICLE Asset INI file has several sections in it
Texture
General
Emitter Declaration Stage Declaration |
| Binding
to DNA Objects, and triggers Triggers are un-documentable at this time, so we'll just cover the simplest case of an object (like a campfire) which just emits particles constantly. Your object will already have a PLAN file, to which you will add the following:
In the [general] section you add that 'numParticles' line indicating the number of particle systems used by that object (limited to one as of this writing) Then in each [particleN] section, you define which particle system configuration file is to be used, and which node of the DNA to bind the emitters to. (use of anything but 'root' is not yet documented, so forget about that for now) Eventually, I will tell you how to:
|
| Generating
Particle Art I won't kid you, I am not very good at this. I struggle with mapZone2 to get something useful. I know mapZone2 can do ANYTHING, but it's still hard for me. When you have been successful you have an image file in some format (bmp? jpg?) where beautiful flame/smoke/whatever plasma is on a black background. I then make a NEW file, with a film-strip shape (say 1024 x 64 pixels to make one row of 16 columns) and make it solid black, then copy bits of the beautiful flame into individual cells (the original image being a bunch of individual flamey bits) nicely centered for my needs. So that's:
|
| Getting
an Alpha Channel from Source Art without One So, you have generated a beautiful filmstrip of images in a single file with a black background. Keep that file around forever, as you might need to edit it someday. But now we need to make a PNG file with that black background turned into alpha transparency (and the 'dimmer' parts of the image to be SEMI_transparent). Let's pretend your original file is a JPG and the final file will be a PNG. And that you are using GIMP 1.) start GIMP And, of course, use your own serial number. Copy the file to your assets/TEXTURES folder. |
| Debugging
without going crazy It can be tedious having to restart the game and travelling to some location every time you tweak some configuration value in your particle script, so I added a command to the DEBUG menu. It is currently the 'reload scripts' command and it causes all action scripts and particle definitions to be reloaded. So, on a good day, you drop an object with your particle system on it, decide what you need to change, then, without stopping the game, edit the particle .ini file, save the changes and select 'reload scripts' to have it take effect. You can also spot-test a particle system by using the 'play' command, by typing:
Where you provide the name of the particle asset you want to try. For particle systems which are intended to be bound to a DNA object, this can be a little odd. Probably your avatar will be used as the source object. You can make your own macros for things you do a log, like, say:
Then later you just type "/fog" to play that. The 'play' command is just for you, no one else sees the particles you are playing. |
| Sharing
Particles At some point the peer to peer file system will automatically share the PARTICLE assets and their attendent texture images. That may be spotty right now, my apologies. |
| Example:
Fire from a point Generates particles in a small box, let's them float up and out and fade [texture] ; There must be
at least one emitter (max of 16) and one stage
(max of 16) [stage1] ; this is a
random box emitter, particles start at some
random spot in the box |
| Example:
Fog in an Area Large blobs appear in a large area, then fade [texture] [stage1] [stage2]
|
| Example:
Snow Zillions of tiny flaks all around the camera (this is expensive, due to the zillion) [texture] [stage1] [stage2] [emitter0] |
| Example:
Hail This example has hard particles which fall rapidly in a straight line until they hit the surface, at which point they 'bounce' by going through a couple extra stages with an inversion of Y velocity on each bounce. [texture] [General] [stage1] [stage2] [stage3] ; this is a
random box emitter, particles start at some
random spot in the box |